Zoom App - Phone
Zoom Web Portal Phone Settings
Accessing the Phone menu in the Zoom web portal for the first time
1. Log in to the BCCS Zoom web portal.
Zoom.us → Click the login with Google button
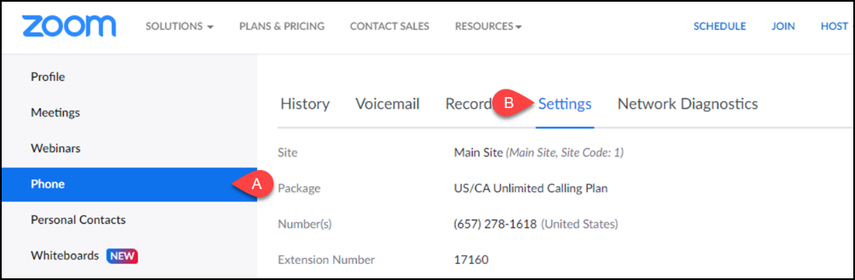
2. Click on the Phone menu.
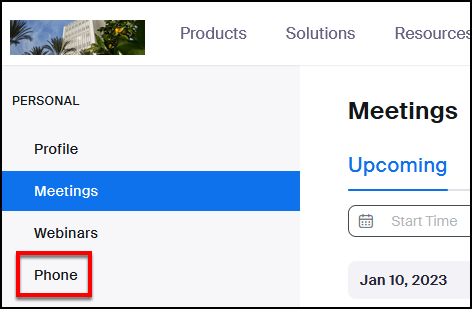
3. You may be prompted to set a new pin, take note if so
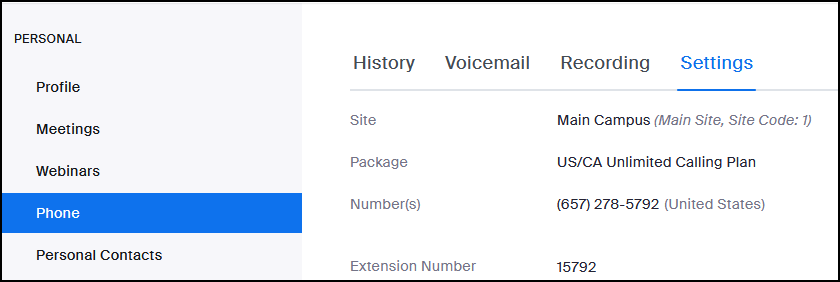
4. You're done! You can now access History, Voicemail, Recording (if applicable), and Settings for your Zoom Phone.
View Call History
1. Select Phone from the navigation panel on the left. Then, click History to view your call history.

- From the navigation panel, click Phone.
- Click the History heading.
- Use the date fields to select the timeframe that you want to view calls for.
- Enter a name, number, or extension in the search field if you wish to search for calls from a specific person/number.
- If you want to download an Excel file of your call history, click Export.
- Check the Show missed calls only box if you only want to view your missed calls.
- View Call History details including contact, date and time of call, duration of call, and result.
1. Select Phone from the navigation panel on the left. Then, click Voicemail to view your voicemails.
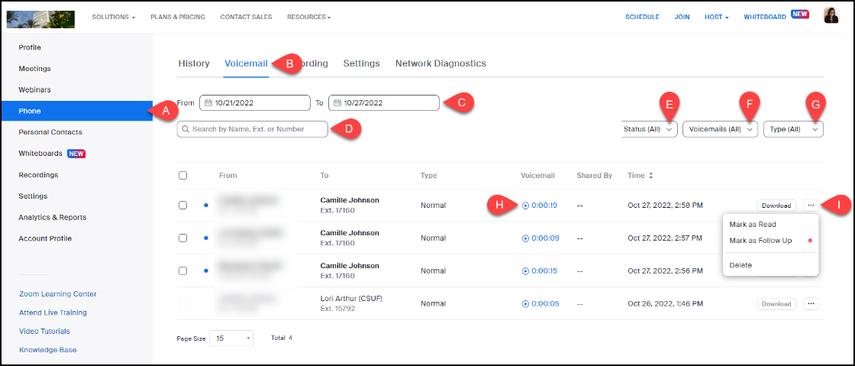
- From the navigation panel, click Phone.
- Click the Voicemail heading.
- Use the date fields to select the timeframe that you want to view voicemails for.
- Enter a name, number, or extension in the search field if you wish to search for voicemails from a specific person/number.
- Use the Status drop-down menu to select if you want to view All, Unread, Read, or Follow Up voicemails.
- If you have multiple lines, use the Voicemails drop-down menu to select which line/s you want to view voicemails for.
- Use the Type drop-down menu to narrow down results by Normal, Spam, or Maybe Spam voicemails.
- Click the play icon or timestamp to listen to the voicemail.
- Click the ellipses button to open the menu to Mark as Read, Mark as Follow Up, or Delete the voicemail.
Forward calls to voicemail
This will allow you to send calls directly to voicemail if you're busy on another call or if you're unable to answer a call.
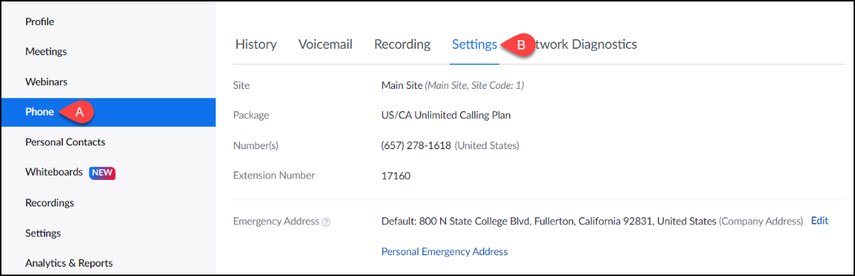
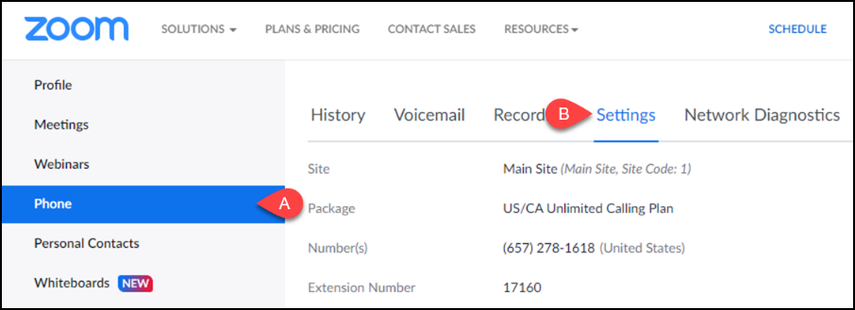
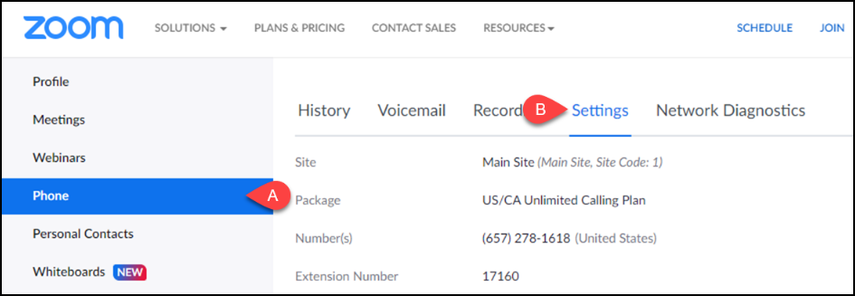
1. Select Phone from the navigation menu on the left side of the page. Then, click Settings.

- Click Phone.
- Click Settings.
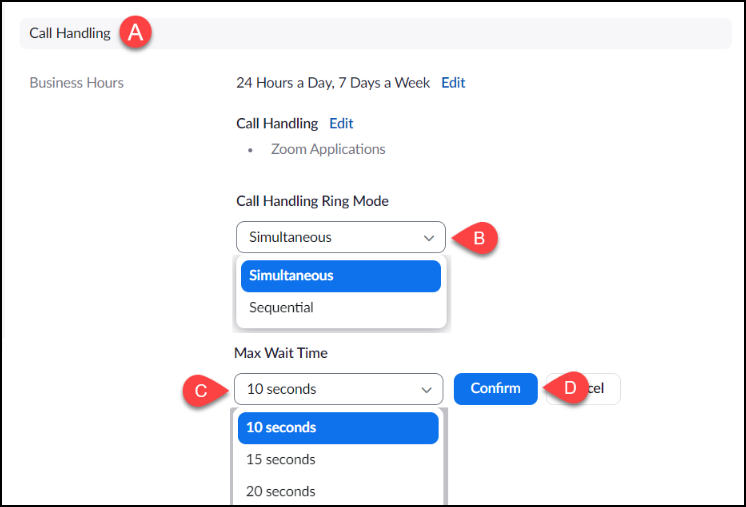
2. Scroll to find the Call Handling section. Set your Call Handling Ring Mode. Then, select how long you want the Max Wait Time to be. Click Confirm to save your selections.

- Go to the Call Handling section in Phone Settings.
- Set the Call Handling Ring Mode using the drop-down menu. Simultaneous will ring the Zoom app and selected Zoom Phone devices (e.g. mobile, desk phone) at the same time. Sequential will ring the Zoom app first, and then other devices one at a time.
- Using the drop-down menu, set the Max Wait Time to wait before calls are forwarded.
- Click Confirm to save.
3. Under When I'm busy on another call, select Forward to voicemail/videomail from the drop-down menu. Click Save to save your changes.
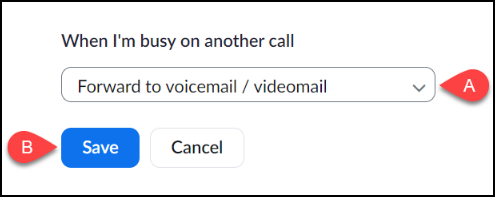
- Use the drop-down menu under When I'm busy on another call, to select Forward to another extension.
- Click Save.
4. Under When a call is not answered, select Forward to voicemail/videomail from the drop-down menu. From the Forward to drop-down menu, select User. Then, enter the name or extension of the user that you want to forward calls to. Check the box if you would like your voicemail greeting to play at the end of the forwarding sequence. Click Save to save your changes.
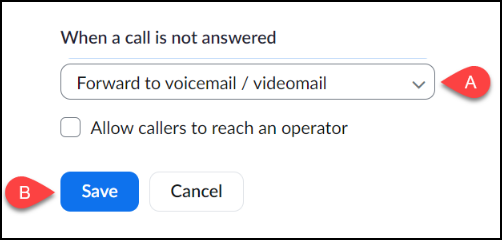
- Use the drop-down menu under When a call is not answered, to select Forward to another extension.
- Click Save.
Forward calls to another campus extension
This will allow you to automatically send calls to another extension if you're busy on another call or if you're unable to answer a call.
1. Select Phone from the navigation menu on the left side of the page. Then, click Settings.
- Click Phone.
- Click Settings.
2. Scroll to find the Call Handling section. Set your Call Handling Ring Mode. Then, select how long you want the Max Wait Time to be. Click Confirm to save your selections.
- Go to the Call Handling section in Phone Settings.
- Set the Call Handling Ring Mode using the drop-down menu. Simultaneous will ring the Zoom app and selected Zoom Phone devices (e.g. mobile, desk phone) at the same time. Sequential will ring the Zoom app first, and then other devices one at a time.
- Using the drop-down menu, set the Max Wait Time to wait before calls are forwarded.
- Click Confirm to save.
3. Under When I'm busy on another call, select Forward to another extension from the drop-down menu. From the Forward to drop-down menu, select User. Then, enter the name or extension of the user that you want to forward calls to. Check the box if you would like your voicemail greeting to play at the end of the forwarding sequence. Click Save to save your changes.
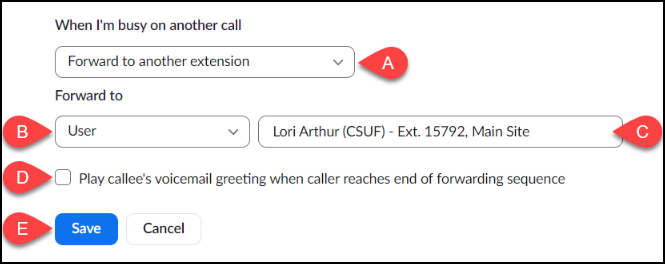
- Use the drop-down menu under When I'm busy on another call, to select Forward to another extension.
- Under Forward to, use the drop-down menu to select User.
- Enter the name or extension of the user that you want your calls to be forwarded to.
- Place a check in the checkbox if you would like your voicemail greeting to play if the caller is not able to reach the user that your calls are forwarded to.
- Click Save.
4. Under When a call is not answered, select Forward to another extension from the drop-down menu. From the Forward to drop-down menu, select User. Then, enter the name or extension of the user that you want to forward calls to. Check the box if you would like your voicemail greeting to play at the end of the forwarding sequence. Click Save to save your changes.

- Use the drop-down menu under When a call is not answered, to select Forward to another extension.
- Under Forward to, use the drop-down menu to select User.
- Enter the name or extension of the user that you want your calls to be forwarded to.
- Place a check in the checkbox if you would like your voicemail greeting to play if the caller is not able to reach the user that your calls are forwarded to.
- Click Save.
Change default Caller ID for your Zoom apps and/or desk phone
1. Click on the Phone menu in the Zoom Web Portal and then click on the Outbound Caller ID drop-down menu.
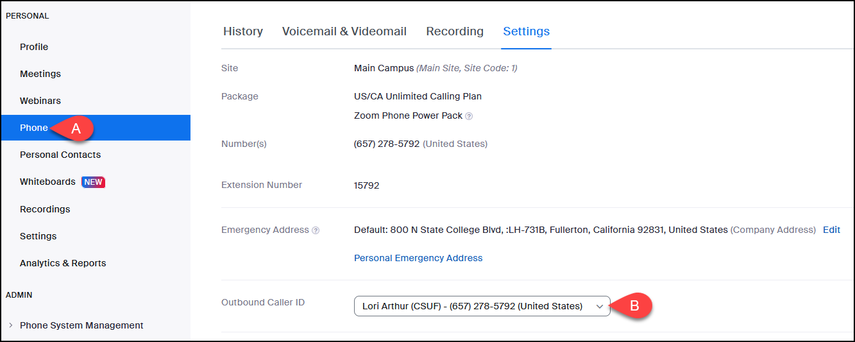
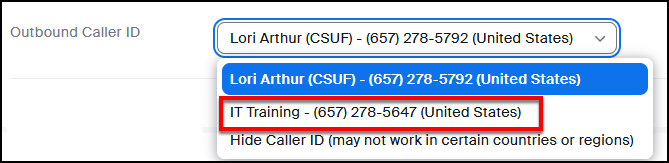
2. Select the Caller ID you want to use. Or select Hide Caller ID to block your caller ID.
Keep in mind that many people do not answer calls when the Caller ID is blocked.
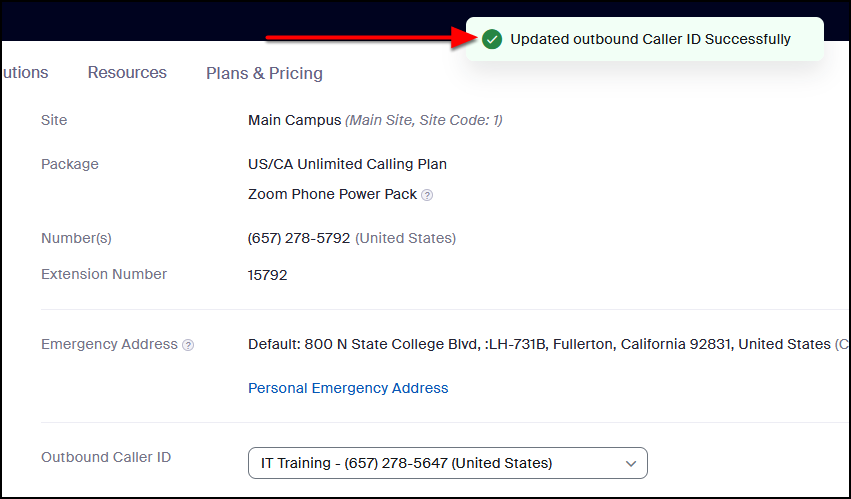
3. Click Save to save your change.

4. You'll see a confirmation that your caller ID was updated successfully.
Set Business Hours
Business Hours in Zoom Phone can be set to reflect the time during which you will be answering calls. You can also customize how calls will be routed during Closed Hours.
1. Select Phone from the navigation panel on the left. Then, click Settings. Scroll to find Business Hours under the Call Handling section.
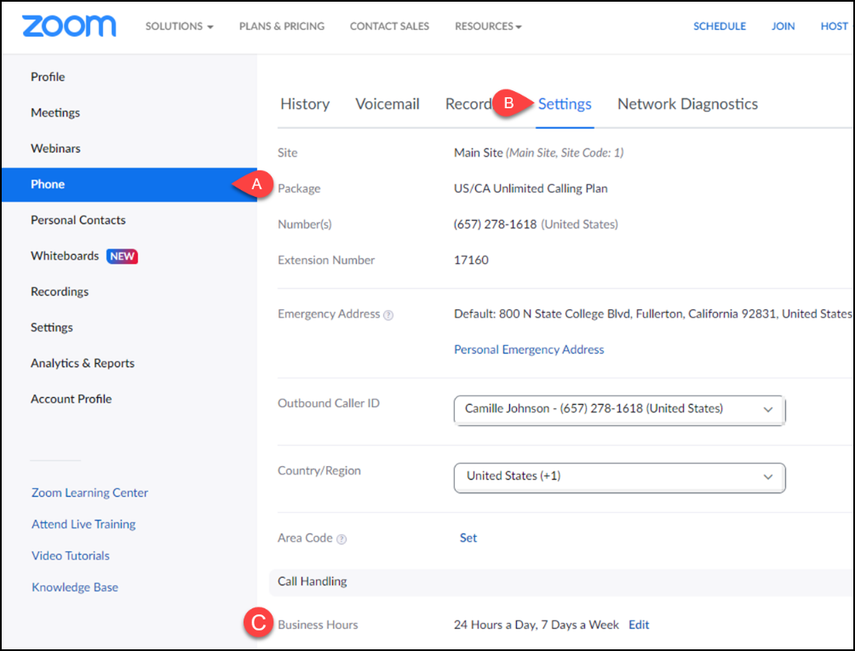
- From the navigation panel, click Phone.
- Click the Settings heading.
- Locate your Business Hours under the Call Handling section.
2. To change your business hours, click Edit.

3. The default is set to 24 Hours a Day, 7 Days a Week. If you would like to use the default value, click OK.

4. To customize your business hours, select Custom Hours. Then, use the checkboxes and drop-down menus to set the days and times when you will be available to answer calls. Click OK to save your changes.
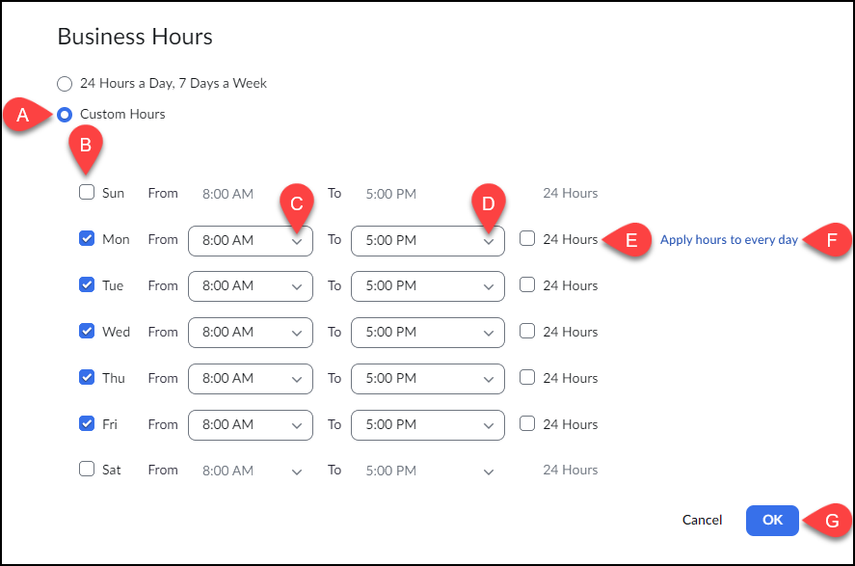
- Select Custom Hours.
- Use the Day checkboxes to select what days you will be picking up calls.
- Use the From drop-down menu to select what time you will begin answering calls on that day.
- Use the drop-down menu to select when you will stop answering calls on that day.
- Check the 24 Hours box if you want to be able to answer calls all day.
- Hover in the blank space next to a line to view the Apply hours to every day link. Click this if you want to apply that line's conditions to all days.
- Click OK to save.
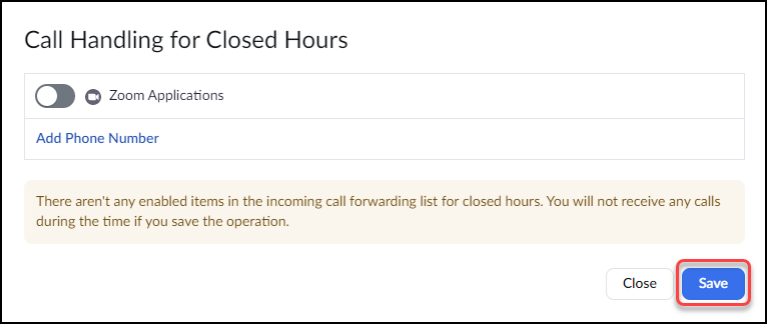
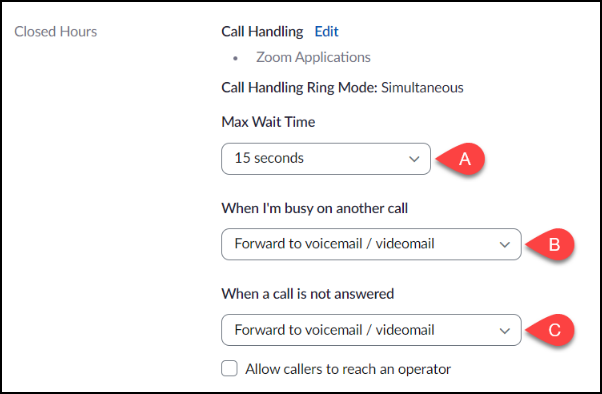
5. The Closed Hours section will appear below after you've saved your custom hours. To set how to handle calls outside of business hours, click the Edit link next to Call Handling.

6. If you do not want to receive calls on your Zoom desktop client, mobile app, or other connected devices during closed hours, click Save.
Inbound calls received during closed hours will be visible in the call history as missed calls.
7. If you want to customize how Zoom routes calls received during closed hours, toggle on the button next to the device/s you want calls routed to. Then, click Close.
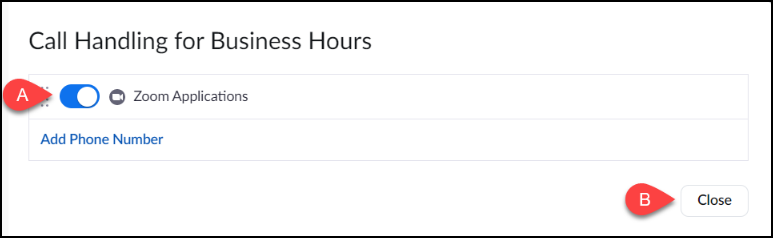
- Toggle the button next to the device/s you want to route calls to.
- Click Close.
8. Use the drop-down menus to set the max wait time, routing for when you're busy on another call, and routing for when a call is not answered.
Want to know more about the various Call Handling options and settings? View Zoom's support guide on Call Handling.
Set Holiday Hours
This features allows you to designate certain days or time periods as holidays. You can customize how calls will be routed during this time and set specialized voicemail greetings.
1. Select Phone from the navigation panel on the left. Then, click Settings.
- From the navigation panel, click Phone.
- Click the Settings heading.
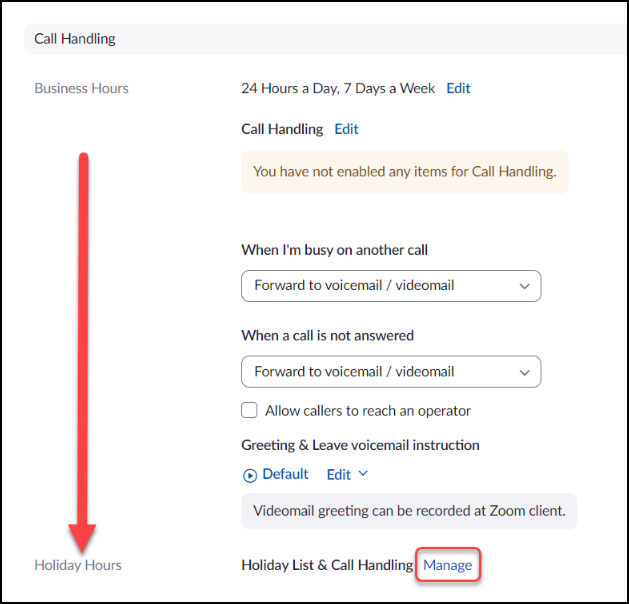
2. Scroll to find Holiday Hours under the Call Handling section. Click Manage to customize your holiday hours and greetings.
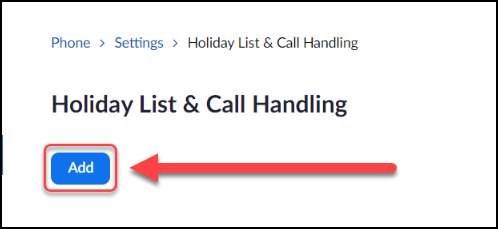
3. Click Add.
4. Enter the name of the holiday. Then, click the clock icon to enter the start day and time of the holiday. Next, click the clock icon to enter the end day and time. Click Save.
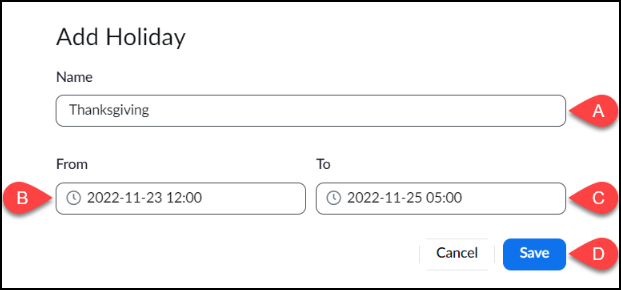
- Type in the name of the holiday.
- Click the From clock icon and use the calendar to enter in a start date and time for the holiday.
- Click the To clock icon and use the calendar to enter in an end date and time for the holiday.
- Click Save.
5. If you want to enable items for Call Handling, click Edit to select or add devices. Then, use the drop-down menu to choose how the call will be routed when unanswered. You can use the default voicemail greeting or click Edit to add a custom greeting.
Want to know more about the various Call Handling options and settings? View Zoom's support guide on Call Handling.
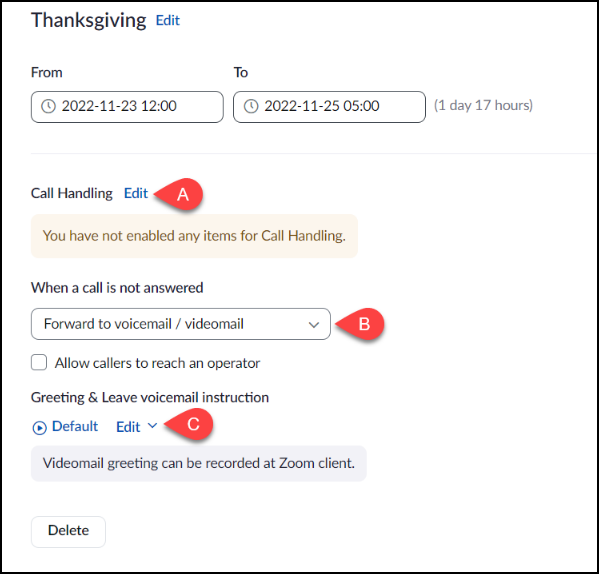
- Click Edit next to Call Handling to enable or disable Call Handling items.
- Use the When a call is not answered drop-down menu to select how you want the call to be handled.
- Click Edit under Greeting & Leave voicemail instruction if you would like to add a custom greeting.
Phone screen lock on desk phone
This feature will enable the Lock softkey on your desk phone. To unlock your phone, you will need to enter your PIN.
1. Select Phone from the navigation panel on the left. Then, click Settings.

- From the navigation panel, click Phone.
- Click the Settings heading.
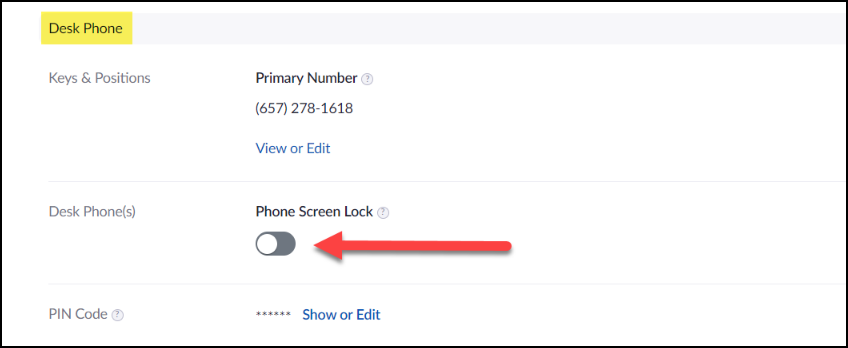
2. Scroll down to the Desk Phone section. Toggle the button under Phone Screen Lock.
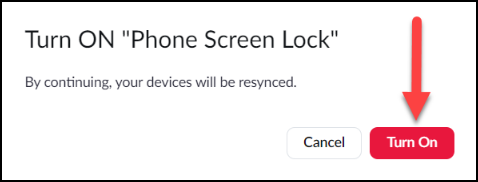
3. Click Turn On.
Turning on phone screen lock will resync your devices.
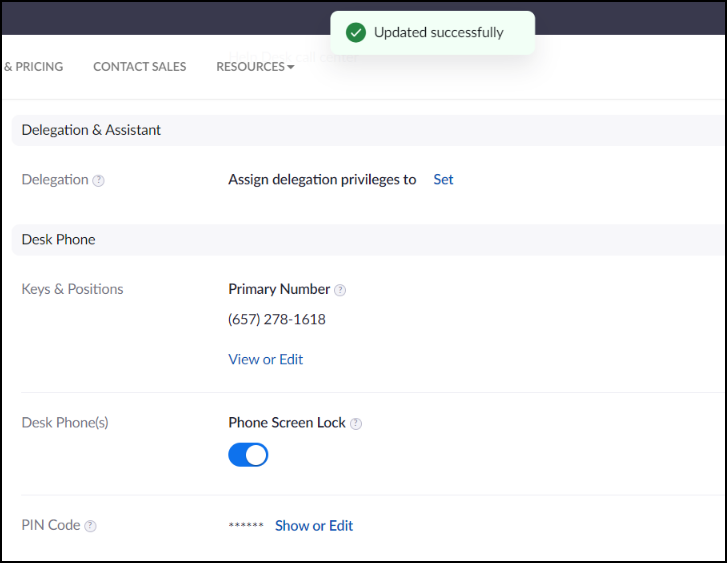
4. A message prompt will appear to confirm that you have successfully updated your phone screen lock status.
Change PIN Code
The PIN is used to access voicemail, hot desking, and unlock desk phones.
1. Select Phone from the navigation panel on the left. Then, click Settings.

- From the navigation panel, click Phone.
- Click the Settings heading.
2. Scroll down to the Desk Phone section. Then, click the Show or Edit link next to PIN Code.
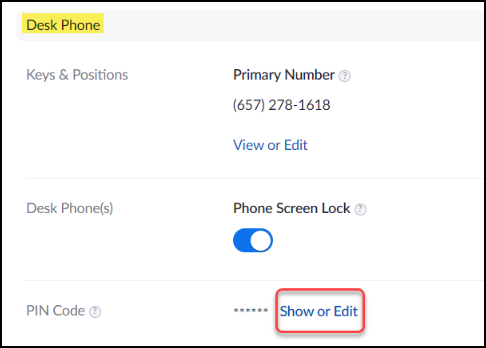
3. Enter your desired PIN into the text box. Then, click Save to add or change your PIN.
Your PIN should be 4-20 digits.
Changing your PIN will resync your devices.
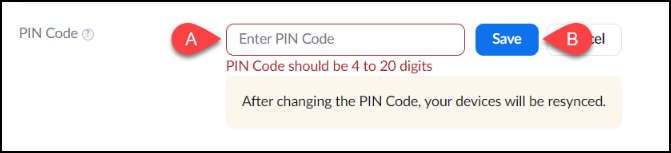
- Enter a 4-20 digit value to use as your PIN Code.
- Click Save.
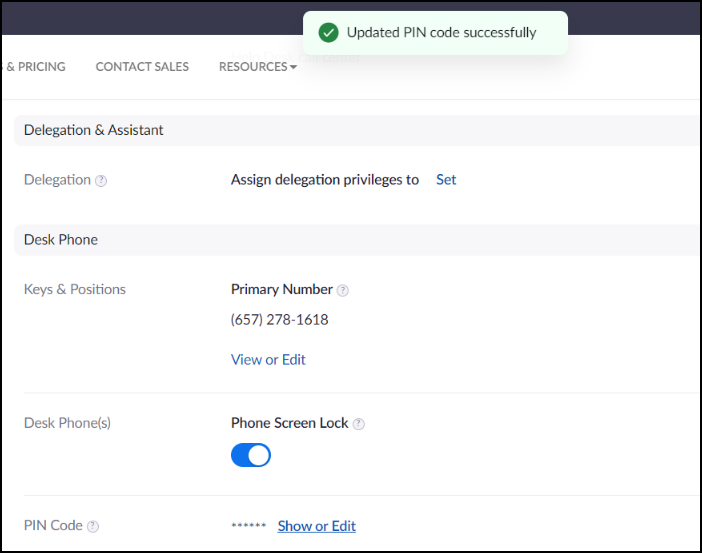
4. A message prompt will appear to confirm that you have successfully updated your PIN code
If you forget your PIN, you can return to this screen and click Show or Edit to view your PIN. Clicking Cancel will allow you to exit without changing your PIN.
Voicemail & Videomail delegation
Choose or Add default voicemail greeting
1. Select Phone from the navigation panel on the left. Then, click Settings.
- From the navigation panel, click Phone.
- Click the Settings heading.
2. Scroll to find Greeting & Leave voicemail instruction under the Call Handling section. If you want to change your voicemail greeting from the default, click Edit. Then, select Choose from Asset Library or Add Audio.
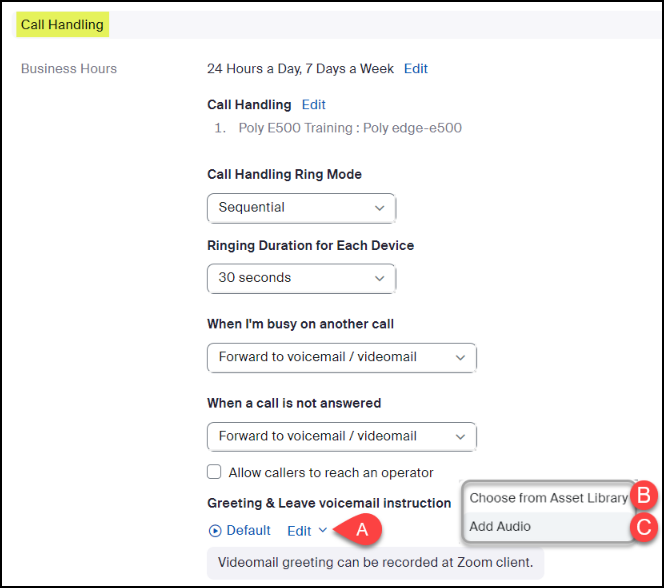
- Click Edit to change your voicemail greeting.
- If you have previously uploaded or created an audio file that you want to use as a voicemail greeting, select Choose audio from Asset Library.
- If you would like to upload a new audio file, select Add Audio.
2.1. To choose from your Asset Library, select the file you want to set as your default voicemail greeting. Then, click Save.

- Select which file you want to use as your greeting.
- Click Save.
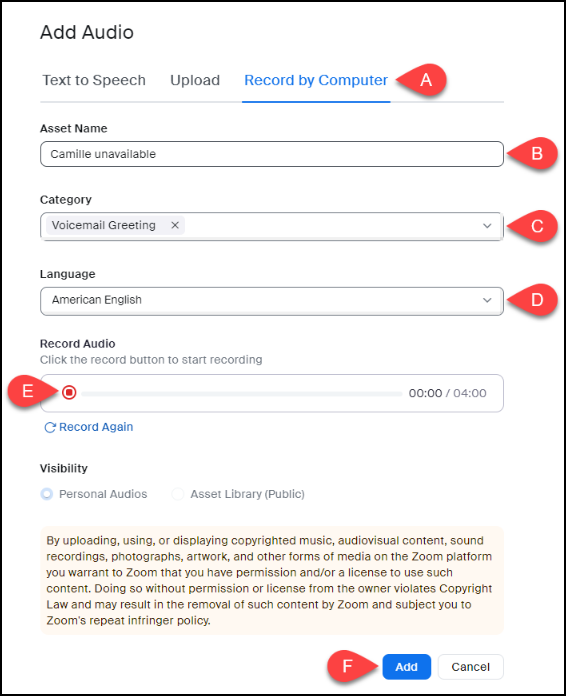
2.2. To record a new voicemail greeting, click Record by Computer. Then, type in the Asset Name. Select Voicemail Greeting from the Category menu. Select a language from the Language menu. Then, click the Record button to begin recording your message. When you're finished, click Add.
- Click Upload.
- Enter a title in the Asset Name.
- Select Voicemail Greeting from the Category drop-down menu.
- Select a language from the Language drop-down menu.
- Click the Record button to record your message.
- Click Add to add the recording to your Asset Library and set it as your voicemail greeting.
Blocked lists
This feature allows you to block certain phone numbers. This is helpful if you receive spam calls.
1. Select Phone from the navigation panel on the left. Then, click Settings.
- From the navigation panel, click Phone.
- Click the Settings heading.
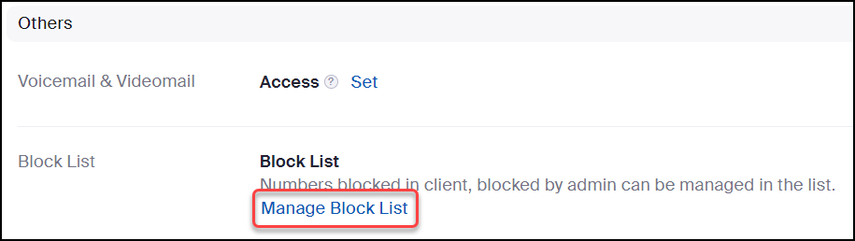
2. Scroll down to the Others section to view Block List and Block Rules. You can add individual numbers to the Block List by clicking Manage Block List.
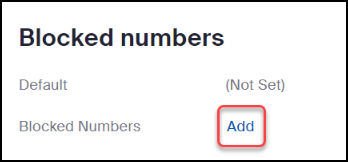
3. Click Add next to Blocked Numbers.
4. Select a country code using the drop-down menu. Then, type in the phone number. Click Save to add the number to your Block List.
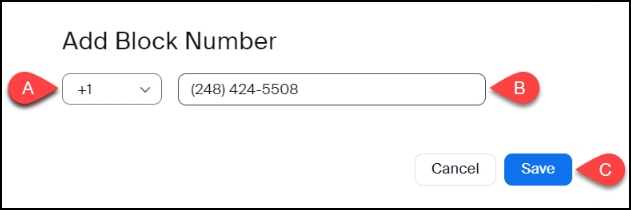
- Use the drop-down menu to select a country code.
- Enter the phone number you wish to block.
- Click Save.
Audio prompt language
You can use this setting to change the default language of automated audio prompts. These settings will apply to all your extensions except for call queues.
1. Select Phone from the navigation panel on the left. Then, click Settings.

- From the navigation panel, click Phone.
- Click the Settings heading.
2. Scroll down to the Others section. Use the Audio Prompt Language drop-down menu to select your preferred language for automated audio prompts. Then, click Save to save your changes.

- Select your preferred language from the Audio Prompt Language drop-down menu.
- Click Save.
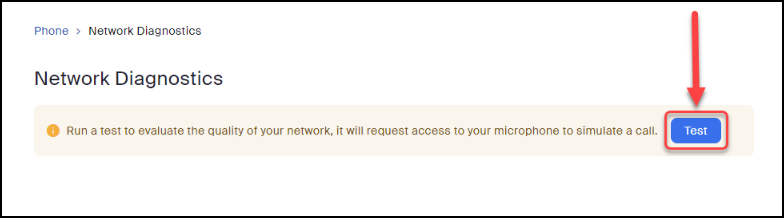
Network Diagnostics (test call)
1. Select Phone from the navigation panel on the left. Then, click Network Diagnostics.

- From the navigation panel, click Phone.
- Click the Network Diagnostics heading.
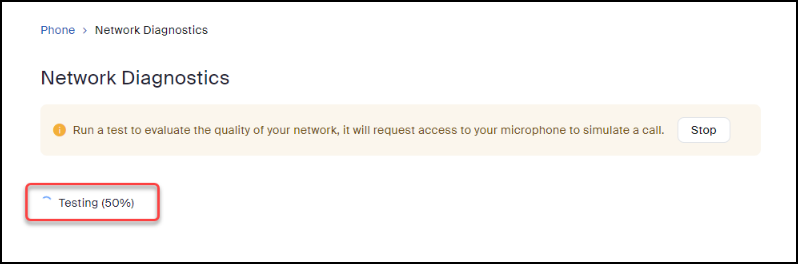
2. Click Test to run a test to evaluate the quality of your network.
3. While the test is running, the tracker at the bottom of the screen will show its progress.
If you desire to stop the diagnosis while it is running, click Stop.
4. At the end of the test, the screen will display your IP address and server address as well as various metrics.
You may want to save a screenshot of this screen to provide to the Helpdesk or Telecom if you are requesting assistance.

- Zoom Web Portal Phone Settings
- 1. Log in to the BCCS Zoom web portal.
- 2. Click on the Phone menu.
- 3. You may be prompted to set a new pin, take note if so
- 4. You're done! You can now access History, Voicemail, Recording (if applicable), and Settings for your Zoom Phone.
- 1. Select Phone from the navigation panel on the left. Then, click History to view your call history.
- 1. Select Phone from the navigation panel on the left. Then, click Voicemail to view your voicemails.
- 1. Select Phone from the navigation menu on the left side of the page. Then, click Settings.
- 2. Scroll to find the Call Handling section. Set your Call Handling Ring Mode. Then, select how long you want the Max Wait Time to be. Click Confirm to save your selections.
- 3. Under When I'm busy on another call, select Forward to voicemail/videomail from the drop-down menu. Click Save to save your changes.
- 4. Under When a call is not answered, select Forward to voicemail/videomail from the drop-down menu. From the Forward to drop-down menu, select User. Then, enter the name or extension of the user that you want to forward calls to. Check the box if you would like your voicemail greeting to play at the end of the forwarding sequence. Click Save to save your changes.
- 1. Select Phone from the navigation menu on the left side of the page. Then, click Settings.
- 2. Scroll to find the Call Handling section. Set your Call Handling Ring Mode. Then, select how long you want the Max Wait Time to be. Click Confirm to save your selections.
- 3. Under When I'm busy on another call, select Forward to another extension from the drop-down menu. From the Forward to drop-down menu, select User. Then, enter the name or extension of the user that you want to forward calls to. Check the box if you would like your voicemail greeting to play at the end of the forwarding sequence. Click Save to save your changes.
- 4. Under When a call is not answered, select Forward to another extension from the drop-down menu. From the Forward to drop-down menu, select User. Then, enter the name or extension of the user that you want to forward calls to. Check the box if you would like your voicemail greeting to play at the end of the forwarding sequence. Click Save to save your changes.
- 1. Click on the Phone menu in the Zoom Web Portal and then click on the Outbound Caller ID drop-down menu.
- 2. Select the Caller ID you want to use. Or select Hide Caller ID to block your caller ID.
- 3. Click Save to save your change.
- 4. You'll see a confirmation that your caller ID was updated successfully.
- 1. Select Phone from the navigation panel on the left. Then, click Settings. Scroll to find Business Hours under the Call Handling section.
- 2. To change your business hours, click Edit.
- 3. The default is set to 24 Hours a Day, 7 Days a Week. If you would like to use the default value, click OK.
- 4. To customize your business hours, select Custom Hours. Then, use the checkboxes and drop-down menus to set the days and times when you will be available to answer calls. Click OK to save your changes.
- 5. The Closed Hours section will appear below after you've saved your custom hours. To set how to handle calls outside of business hours, click the Edit link next to Call Handling.
- 6. If you do not want to receive calls on your Zoom desktop client, mobile app, or other connected devices during closed hours, click Save.
- 7. If you want to customize how Zoom routes calls received during closed hours, toggle on the button next to the device/s you want calls routed to. Then, click Close.
- 8. Use the drop-down menus to set the max wait time, routing for when you're busy on another call, and routing for when a call is not answered.
- 1. Select Phone from the navigation panel on the left. Then, click Settings.
- 2. Scroll to find Holiday Hours under the Call Handling section. Click Manage to customize your holiday hours and greetings.
- 3. Click Add.
- 4. Enter the name of the holiday. Then, click the clock icon to enter the start day and time of the holiday. Next, click the clock icon to enter the end day and time. Click Save.
- 5. If you want to enable items for Call Handling, click Edit to select or add devices. Then, use the drop-down menu to choose how the call will be routed when unanswered. You can use the default voicemail greeting or click Edit to add a custom greeting.
- 1. Select Phone from the navigation panel on the left. Then, click Settings.
- 2. Scroll down to the Desk Phone section. Toggle the button under Phone Screen Lock.
- 3. Click Turn On.
- 4. A message prompt will appear to confirm that you have successfully updated your phone screen lock status.
- 1. Select Phone from the navigation panel on the left. Then, click Settings.
- 2. Scroll down to the Desk Phone section. Then, click the Show or Edit link next to PIN Code.
- 3. Enter your desired PIN into the text box. Then, click Save to add or change your PIN.
- 4. A message prompt will appear to confirm that you have successfully updated your PIN code
- 1. Select Phone from the navigation panel on the left. Then, click Settings.
- 2. Scroll to find Greeting & Leave voicemail instruction under the Call Handling section. If you want to change your voicemail greeting from the default, click Edit. Then, select Choose from Asset Library or Add Audio.
- 2.1. To choose from your Asset Library, select the file you want to set as your default voicemail greeting. Then, click Save.
- 2.2. To record a new voicemail greeting, click Record by Computer. Then, type in the Asset Name. Select Voicemail Greeting from the Category menu. Select a language from the Language menu. Then, click the Record button to begin recording your message. When you're finished, click Add.
- 1. Select Phone from the navigation panel on the left. Then, click Settings.
- 2. Scroll down to the Others section to view Block List and Block Rules. You can add individual numbers to the Block List by clicking Manage Block List.
- 3. Click Add next to Blocked Numbers.
- 4. Select a country code using the drop-down menu. Then, type in the phone number. Click Save to add the number to your Block List.
- 1. Select Phone from the navigation panel on the left. Then, click Settings.
- 2. Scroll down to the Others section. Use the Audio Prompt Language drop-down menu to select your preferred language for automated audio prompts. Then, click Save to save your changes.
- 1. Select Phone from the navigation panel on the left. Then, click Network Diagnostics.
- 2. Click Test to run a test to evaluate the quality of your network.
- 3. While the test is running, the tracker at the bottom of the screen will show its progress.
- 4. At the end of the test, the screen will display your IP address and server address as well as various metrics.